Poor Vinnie has been neglected for a while. I've been a complete lazy bum, barely doing any work here. Perhaps I'm lacking motivation, maybe I'm just lazy, maybe maybe.. I don't know. I do need to focus on Vinnie and get the few items left done so I can move on and get financing. Just a temporary funk.
I sure can waste time reading stuff on the internet, let me tell you.
Saturday, February 11, 2012
Monday, January 30, 2012
sickness
katie & i moved into the house in milford (vinnie) almost a month ago, at the beginning of january. since that time my productivity in performing work on the house has plummeted. to be fair, there is alot of sorting things out, storing things, buying things, and general organizing. and, i've had a nasty cold recently that has really done a number on me, and i've barely done a thing for a few days now.
let's have a list of items still needing work on the house, shall we?
let's have a list of items still needing work on the house, shall we?
- currently, most of the baseboard is cut and laying along the walls of the house ready to be nailed.
- then it needs to be painted.
- i still need to build & install the window trim for all the windows.
- the casing around doorways needs to be painted yet.
- kitchen cabinet hardware needs to be installed
- interior doors need to be painted
Sunday, November 13, 2011
Tile and flooring
Almost done. Hold onto your shorts.
The tile in the master bath and kitchen needs to get laid. The laminate flooring throughout the rest of the house needs to go down. The closet and pantry doors need to be installed. The half wall supporting the kitchen peninsula needs to get built and installed. The side deck landing pad and driveway stone needs to be placed.
Hustle, hustle. I probably have some pics somewhere I should put online..
Tuesday, June 28, 2011
outlet adapters
as constructed:
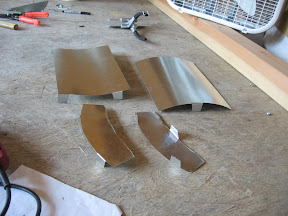
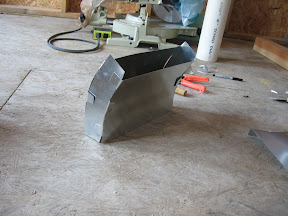
A curved implementation wasn't difficult. You can see the tabs I used along the curved seams to support the seam. Pre-curling of the metal was done by rubbing against PVC pipe.
 |
| From vinnie pics by mike |
 |
| From vinnie pics by mike |
A curved implementation wasn't difficult. You can see the tabs I used along the curved seams to support the seam. Pre-curling of the metal was done by rubbing against PVC pipe.
Thursday, April 7, 2011
registers
One small oversight in ductwork planning was the geometry of the underfloor space at the register outlets. I planned on having the ductwork bend upward and come straight up to the register outlets along the perimeter walls. I failed to realize the part of the floor adjacent to the exterior walls is actually located over the foundation wall, and the ductwork needed to come in at an angle.

I have already purchased the round pipe to 2-1/4x12 rectangular adapters, shown in purple. These are straight fittings, so the input round pipe and output rectangular pipe are in a straight line. I now need to fabricate the rectangular bends, shown in red, to connect from my supply lines to the baseboard registers. I'm also considering making the red bends curved rather than a sharp angle. If it can be fabricated without much trouble, it may improve airflow a bit.
The floorjoist on the left, shown with a single diagonal line, is the closest joist to a register outlet in the whole house, it's only at one location. I put it there to be sure my configuration would work at this tightest spot.
the status of things
I have a few things on my plate currently.
I need to finalize the details of the master bath shower and acquire the necessary materials before I begin working on it. This includes the waterproof shower pan at the floor and the walls, and the details up to the tile. I think I will use a PVC liner for the pan and redgard over concrete backerboard on the walls.
I need to install boxes & run all the low voltage lines - tv/internet/phone. I'm going to run RG6 quadshield for the cable and cat6 for ethernet/phone. The RG6 lines run from the boxes to a splitter in the crawl, and the cat6 lines run from the boxes to a central box in the linen closet. An ethernet switch can go in the closet to merge all the cat6 lines. Alternatively, an internet phone or hardline phone can come into the closet, then feed onto the cat6 lines. The cat6 terminations in the rooms can either be ethernet jacks (from a switch) or can be wired to telephone jacks (phone). The system will be easily changeable once the house is done, so a mix of ethernet & telephone can be done as well. The lines & jacks are actually pretty cheap if you buy from the right places.
*edit* To clarify, I'm installing a pair of 8P8C jacks on each phone/net plate, one white & one grey. They come into the linen closet, where they can be connected to an ethernet switch or wired to telephone. A standard phone line - 6P2C, 6P4C, or 6P6C plug can go into the 8P8C jack in the wall, so to change one or both of the white/grey jacks from phone to ethernet only requires changing what's connected to that color jack in the linen closet. Well, that's the plan. I used some info from this page to come up with the scheme.
I need to finish cutting holes for the hvac supply registers in the floor. Currently, I have cut four holes, so I have six more to go. I don't plan on starting to fabricate the ductwork until everything else is ready to go.
Everything else would include running the range hood vent duct through the roof, finishing the shower, finishing low voltage wiring, connecting up the dryer duct, running the main water supply from the entrance valve to the water heater and manifold, ..
I think that covers it. Some big things outside of that would be building the two entrance decks and running the water & sewer lines out to the street. I'm not going to run those lines until my plumbing inspection, which is after the shower pan is complete. I still haven't decided on the timing for the decks yet. I'd love to put them up soon, but I know it's easy to back up the pickup truck to the front door for loading/unloading large items currently, and the deck may make that more difficult..
Saturday, February 19, 2011
hvac'in
Sunday, I ran the copper refrigerant lines in the crawlspace from the blowers to the outdoor unit. They are temporarily supported in place with a few hangers and some velcro straps. Once insulated, they will be permanently supported.
Monday, I spent Valentine's Day with my love.
Tuesday morning, I determined the motion sensor on the side of the house was bad. I spent almost an hour looking at lines and reading voltages and what not. I am slow. The rest of the day was spent helping install my parents' new dishwasher.
Wednesday, I replaced the motion sensor with a new one. I then made flares for the indoor refrigerant connections. It was too windy/dusty outside to work on the exterior flares.
Thursday, I connected the outside flares, pulled a vacuum on one set of blower lines, and cracked the service valve briefly for some soap & bubble checking with low pressures. No bubbles were spotted. This was an exciting day, as I learned the difference between standard hose fittings and low-loss/anti-blowback hose fittings. The latter are very, very handy.
Friday, I vacuumed the other blower lineset, also performed low pressure bubble checks and then fully opened both service valves. This was another fun day of driving back and forth from Milford to Dover, as I discovered the very limited space around the service valves on the Fujitsu required just the right combination of tiny fittings to adapt from a 5/16" to 1/4", and to bend 90 degrees from the unit housing for clearance. The wiring was completed, and the system connected. The instructions stated to wait 12 hours after power before testing.
Saturday morning, I tested the system heat. It was about mid-forties outside. The outside unit was very quiet. It very slowly ramped up its speed. The indoor blowers were also incredibly quiet.. Even full blast, the fans make little noise. They put out nice heat, too.
After an hour or less, I shut down the system to allow the lines to cool, so I could insulate them. As I was fumbling with some pipe insulation outside, I noticed a small bubble slowly form and pop at one of the low pressure flare nuts. I stooped down for a closer look, and watched another bubble slowly form and pop. Doh.
After some investigation of my documentation I determined it was possible I could perform a "pump down" or "recapture" to suck the refrigerant back out from the linesets into the outdoor unit. Then, I would be free to disassemble the flare and try again. If I haven't lost too much refrigerant - which I don't think I have - then it should still work fine without dealing with a recover/recycle operation. I don't have equipment for that, and would likely run a few hundred dollars to have a contractor perform for me. I don't even know if a supply house would sell me the R410A if I had a recovery unit, without a CFC card..
I realize now a nitrogen pressure test is critical to ensure a tight system before bringing the refrigerant into play. A $100 regulator isn't much of an investment, and I found a local supply house with nitrogen tanks.
So, I ordered online a nitrogen regular for $60, a leak detector for $40.. it should arrive sometime the middle of this week, and then I can check for leaks before I release the refrigerant again.
Once that's all done, I can check pressures and temperatures and compare to the spec sheets to ensure the charge is within acceptable range. The unit comes charged with enough refrigerant for a total line distance of 100ft. My units are roughly 40ft total, 60ft less than the max. The specs list a charge of about a quarter oz/ft, so with 60 x 0.25 = 15oz lost, it should still perform to spec. The total factory charge was 74oz, so that's about 20% lost. This is a guestimation of course, only testing will tell for sure.
In the mean time, I'll remake that one flare I know for sure is bad, when the weather looks good. I can run the pipe insulation as well. And finish the condensate piping. And the drain/waste/vent piping..
Subscribe to:
Posts (Atom)