i ordered hardware cloth from agrisupply to serve as lath to stucco/parge the foundation. it arrived the other day, and there's no chance of rain in the forecast for over a week.
the lath is 3' tall, and about 2' of foundation is exposed above grade. i'll dig down just over 1' so the protective stucco goes below grade a bit. i dug out along the rear wall today. i'll try to get some pics up tomorrow.
Wednesday, March 31, 2010
Monday, March 22, 2010
roof completion
the other day - maybe saturday - i finished shingling the small portion of the gable roof at the front. most of the roof was shingled long ago but i didnt get around to finishing it until just recently.
it involved weaving step flashing into the shingle courses which acts as flashing between the roof and the wall it butts into. i used aluminum from home depot which is brown on one side, so the flashing wont be bright or even apparent when viewing the finished house. this flashing is slightly thinner than what i would prefer, but it should last as long as the asphalt shingles.
i was disappointed in completing this portion of the roof, as there were a couple details that should have been worked out better. the intersection of the small gable ridge into the rest of the roof should have been flashed prior to all of the shingles going up. i retrofit some aluminum, but the quality of this flashing isn't too great, as it only acts to shed down flowing water, and may not stand up to pounding rains or ice damns. time will tell. also the ridge vent at this small ridge butts to the larger roof plane. the gap at the ridge should have been set back from this butting point, and i had to retrofit flashing to assist this situation as well.
there's little potential for water intrusion at this portion of the roof, as its mostly over the front overhang.. but i would have preferred to foresee these details beforehand. i will in the future.
i ordered the galvanized hardware cloth for the foundation via the internet today. it cost ~$150 instead of the ~$240 it would have cost from local stores. unfortunately i have to wait for the delivery - i really hope it isn't long.
i want to cover the band joist, but im afraid the OSB covering it will interfere with installation of the mesh. i should have ordered this a long time ago. there are many other products i have delayed ordering, as im concerned about running out of funds and want to prolong that event as far into the future as possible. it's costing me time now, however.
i need to decide on what to do next.
Thursday, March 11, 2010
windows
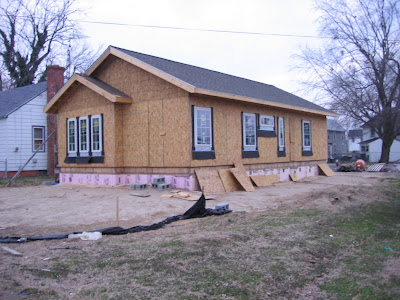
i finished putting in the windows yesterday. i was also very sore and tired for some reason, so i slept in today. i was going to put up the remaining shingles on the front roof today, but we're going to have heavy rain and winds in the next few days, and i don't want to subject new shingles to high winds.
so i'm deciding what to do instead. while i'm here, i might as well update my blog thing. since i've neglected it for quite some time. february was the month of doing nothing it seems. between crazy weather, sickness, and general lack of motivation, i accomplished little..
anyway, let's discuss the windows. they are pella impervia, fiberglass composite windows. this material expands at a rate nearly identical to glass, so as temperatures fluctuate due to seasons and solar exposure, the seals between the glass and frame should remain under consistent pressure and ideally will last much longer than a window of any other type.
all of the windows are either casement, awning, or fixed. no hung/slider types. the operating windows utilize a compression-type seal, which ensures maximal air tightness. sliding-type windows tend to achieve less tightness. (good little factoid on window air tightness)
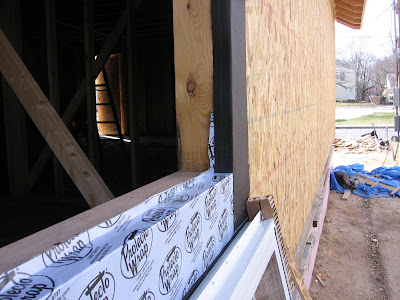
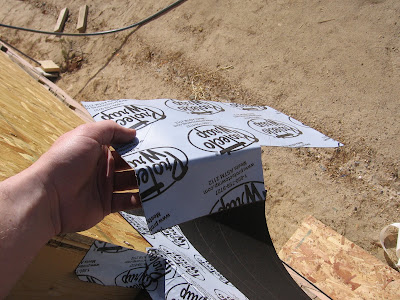
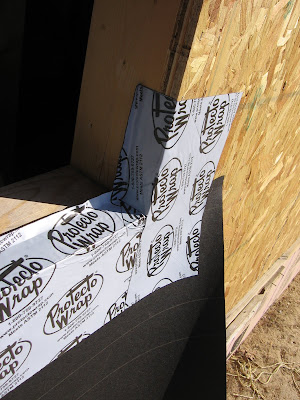
i spent some time deciding on how to flash the windows. there are many options, and i liked some details i found online in an ASTM article. it describes construction of a SAF (self-adhered flashing) sill pan. SAF are asphalt/butyl-based tapes that are supposed to stick forever and keep out water - also called 'flashing tapes.' a sill pan is located at the bottom of a window, where it has a lip toward the inside which diverts water back toward the exterior. you can see the lip well in this shot:
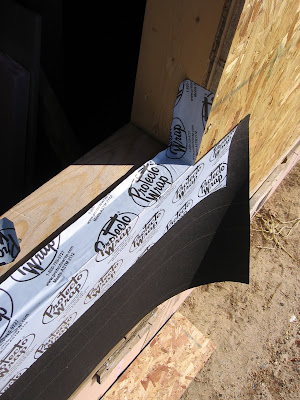
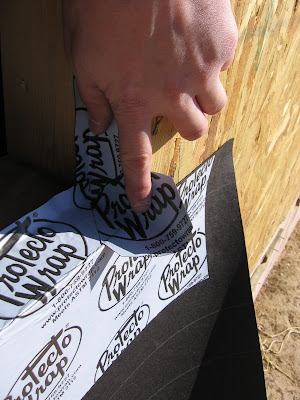
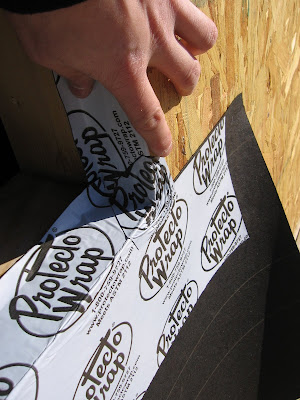
because of how the sill pan fills three-dimensional space, it can't be constructed with a single sheet material, but has to be built-up. i've got some pics of the sill pan construction:
and wala, sill pan installed. cutting the pieces takes longer than installing them. after the sill pan goes on, then felt jamb flashing is attached (you can see it in place in the first shot above.) then the window goes in and i strap a piece of OSB across it to hold it temporarily in place.
next i go inside and direct a vertical laser beam along an edge of the window. i carefully insert shims at the manufacturer-directed locations at the top and bottom jamb locations until the window edge aligns with the laser on both left and right edges. i check both edges to be sure.
then i return outside and nail up a ton of roofing nails into the fins of the window. i kept nails out of the bottom nailing fin, as these are a prime location for water to find its way into the wall, and i feel (after running some structural calcs) that there are sufficient nails to keep the window secured in position. only the awning windows and the wide fixed windows had a few nails placed in the bottom fin.
tada, window installed. lookin good:
so i'm deciding what to do instead. while i'm here, i might as well update my blog thing. since i've neglected it for quite some time. february was the month of doing nothing it seems. between crazy weather, sickness, and general lack of motivation, i accomplished little..
anyway, let's discuss the windows. they are pella impervia, fiberglass composite windows. this material expands at a rate nearly identical to glass, so as temperatures fluctuate due to seasons and solar exposure, the seals between the glass and frame should remain under consistent pressure and ideally will last much longer than a window of any other type.
all of the windows are either casement, awning, or fixed. no hung/slider types. the operating windows utilize a compression-type seal, which ensures maximal air tightness. sliding-type windows tend to achieve less tightness. (good little factoid on window air tightness)
i spent some time deciding on how to flash the windows. there are many options, and i liked some details i found online in an ASTM article. it describes construction of a SAF (self-adhered flashing) sill pan. SAF are asphalt/butyl-based tapes that are supposed to stick forever and keep out water - also called 'flashing tapes.' a sill pan is located at the bottom of a window, where it has a lip toward the inside which diverts water back toward the exterior. you can see the lip well in this shot:
 |
| From vinnie pics by mike |
because of how the sill pan fills three-dimensional space, it can't be constructed with a single sheet material, but has to be built-up. i've got some pics of the sill pan construction:
 |
| From vinnie pics by mike |
 |
| From vinnie pics by mike |
 |
| From vinnie pics by mike |
 |
| From vinnie pics by mike |
 |
| From vinnie pics by mike |
and wala, sill pan installed. cutting the pieces takes longer than installing them. after the sill pan goes on, then felt jamb flashing is attached (you can see it in place in the first shot above.) then the window goes in and i strap a piece of OSB across it to hold it temporarily in place.
next i go inside and direct a vertical laser beam along an edge of the window. i carefully insert shims at the manufacturer-directed locations at the top and bottom jamb locations until the window edge aligns with the laser on both left and right edges. i check both edges to be sure.
then i return outside and nail up a ton of roofing nails into the fins of the window. i kept nails out of the bottom nailing fin, as these are a prime location for water to find its way into the wall, and i feel (after running some structural calcs) that there are sufficient nails to keep the window secured in position. only the awning windows and the wide fixed windows had a few nails placed in the bottom fin.
tada, window installed. lookin good:
 |
| From vinnie pics by mike |
Subscribe to:
Posts (Atom)